
It is important to ensure that timber or wood cladding (siding,rainscreen, weatherboarding) is installed, fixed by a professional/qualified individual moreover to always follow the timber cladding supplier’s guidelines.Guidelines, instructions that are given below cover cladding that is mainly for external applications.
- All timber cladding and battens should be appropriately treated to protect them against rot and insect attack. For use on external applications, they must be treated to UC3 to BS8417 for a BSEN335:1

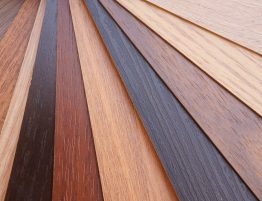
Timber pressure treated in a tank, chamber - Timber cladding can provide a cost-effective and attractive external envelope to a building, but the design and fixing detail needs to accommodate the fact that timber is a natural material and will move in accordance with changing moisture content and the humidity of the environment.
- Use BBA approved breather membrane, i.e. UV ( ultraviolet resistant ) for open joint cladding and normal BBA breather membrane for closed joints.A timber rain-screen can allow moisture through joints, and in such an installation an appropriate breather membrane is recommended to prevent moisture ingress into the structure of the wall.
- The design details should include a cavity of at least 21mm directly behind the cladding to provide adequate drainage and ventilation. This will ensure any moisture which does collect at the back of the boards can be dispersed.
- Use minimum45x45 horizontal battens to support vertical cladding; the horizontal battens need a minimum 15-degree chamfer towards the cavity for drainage
- Use minimum 38×50 support battens to support horizontal cladding on average 450mm centres max 600mm centres maximum
- An appropriate surface coating applied in accordance with the manufacturer’s guidelines will help protect timber cladding from UV degradation, moisture uptake and the risk of any surface growth of algae. It is important to note that any surface coating or finishes need to be maintained annually to maintain the integrity of the coating e.g cleaning off pollutants etc
- Vertical cladding will require double battening (vertical and horizontal) to ensure airflow to the cavity.

Vertical timber cladding
- If timber cladding is to be coated with paint or stain, at least one coat, preferably two, should be applied to all sides and ends of the boards before fixing. A second or third coat can be applied after the boards are fixed.
- Any cut ends of boards or drill holes should be protected with a suitable wood preserver.
- If the boards are not being coated, it is still recommended that the end grain is protected to prevent moisture uptake. Unprotected end grain will readily absorb moisture which can lead to swelling and discolouration.
- Battens should be at least twice the thickness of the cladding boards.
- Nails should be annular ring shank stainless steel to prevent staining and provide sufficient holding power. The nail length should be at least 2.5 times the thickness of the boards. Shorter fixings could be used if screwing due to better pull through
- Fixings to be Grade 304 stainless steel and 316 marine grade stainless steel around coastal areas.Insect mesh should be fitted to all cavity openings.
- Where horizontal cladding boards are butted together additional end support should be provided by fixing a second batten which extends at least the width of one board above and below the board being fixed.
- Butt jointed boards should be fitted with a 5mm gap to allow airflow and for vertical cladding, the ends should be mitred towards the cavity
- Cladding should be cut to ensure a minimum 8mm gap before vertical members of windows, doors, corner trims or similar. This allows airflow to the end of the boards which aids drying and helps prevent excessive moisture uptake.
- Fix with nails at least 20mm from the end of boards and at least 15mm from the edges. Pre-drilling should be carried out for denser species above 700kg/m3 if it is necessary to fix closer to the end or edge of the boards.
- It is recommended that all cladding boards should be double nailed ( face-fixed) at each batten and through the thickest part of the board preferably at quarter points from the edge
- When fitting T&G or half lapped boards e.g. shiplap boards retain a 2mm gap in the joint to allow for any swelling which may occur. The tongue should always be installed facing up.

- Secret fixing through the tongue or groove of standard profiled boards is not recommended as this can split the timber and reduce the holding effect of the nail.
- Nail heads should be fitted flush with the surface of the boards.
- Do not secret fix through the tongue unless then profile is designed explicitly for that with a fixing line along the tongue.
- All cladding should be installed at a distance of no less than 250mm from ground level or splash back level or DPC
- For painted cladding more information is available from, Painted Timber Cladding Guidelines


